Can I replace a trailer fender myself?


As a trailer fender supplier, I often get asked by customers whether they can replace a trailer fender on their own. It's a valid question, especially for those who are looking to save some money or simply enjoy the hands - on experience of DIY projects. In this blog post, I'll delve into the details of whether you can replace a trailer fender by yourself, the steps involved, and the considerations you need to keep in mind.
Assessing Your Skills and Tools
Before you decide to take on the task of replacing a trailer fender, it's essential to assess your mechanical skills and the tools you have at your disposal. Replacing a trailer fender requires basic mechanical knowledge and some common tools. If you've worked on similar projects in the past, such as changing a car tire or doing simple engine repairs, you may have the necessary skills.
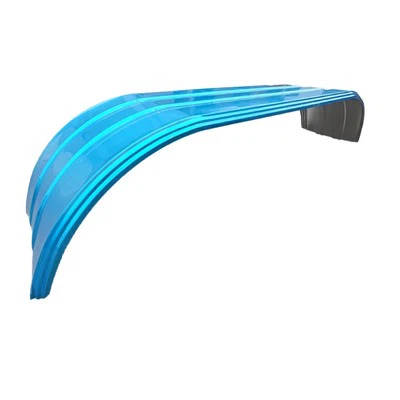
The tools you'll typically need include a socket set, wrenches, a drill (if you need to make new holes), a screwdriver, and a pry bar. Additionally, you'll need a replacement fender that matches the specifications of your trailer. As a supplier, we offer a wide range of trailer fenders, including the Heavy Duty 3 - Axle Straight Fender Mudguard, Heavy Duty Curved Triple Axle Trailer Fender, and Heavy Duty Curved Dual - Axle Truck Fender.
Steps to Replace a Trailer Fender
- Prepare the Trailer: First, make sure the trailer is parked on a flat and stable surface. Engage the parking brake and, if possible, chock the wheels to prevent any accidental movement. This is a crucial safety step to ensure that you can work on the trailer without any risk of it rolling.
- Remove the Old Fender: Locate the bolts or screws that are holding the old fender in place. Using your socket set or wrenches, carefully remove these fasteners. In some cases, the fender may be attached with clips or rivets. If you encounter rivets, you'll need to drill them out. Once all the fasteners are removed, use a pry bar to gently separate the fender from the trailer frame. Be careful not to damage the frame or any other components during this process.
- Inspect the Mounting Area: After removing the old fender, take a close look at the mounting area. Check for any signs of damage, rust, or corrosion. If there is rust, you can use a wire brush to clean it off and apply a rust - inhibitor to prevent further damage. Also, ensure that the mounting holes are in good condition and properly aligned.
- Install the New Fender: Place the new fender in position over the mounting area. Make sure it aligns correctly with the existing holes or the areas where you need to drill new holes. If the fender comes with pre - drilled holes, line them up with the holes on the trailer frame. Insert the bolts or screws through the holes and tighten them securely using your socket set or wrenches. Start by tightening them slightly, then go around and tighten them evenly to ensure a proper fit.
- Test the Installation: Once the new fender is installed, give it a gentle shake to check for any looseness. Make sure it is firmly attached to the trailer. You can also visually inspect the installation to ensure that it looks straight and properly aligned.
Considerations and Potential Challenges
While replacing a trailer fender may seem straightforward, there are some considerations and potential challenges that you need to be aware of.
- Compatibility: It's crucial to ensure that the replacement fender is compatible with your trailer. Different trailers have different specifications, such as the number of axles, the width of the wheels, and the overall design. As a supplier, we can help you select the right fender for your trailer based on its make, model, and year.
- Wiring and Lights: Some trailers have wiring and lights attached to the fenders. If your trailer has these components, you'll need to disconnect and reconnect them properly during the replacement process. Make sure to follow the correct wiring diagrams and take precautions to avoid any electrical shorts.
- Structural Integrity: If the old fender was damaged due to an impact or excessive wear, it's important to check the structural integrity of the trailer frame in the area where the fender was attached. If there is any damage to the frame, it may need to be repaired before installing the new fender.
Benefits of DIY Fender Replacement
If you have the skills and tools to replace a trailer fender yourself, there are several benefits.
- Cost Savings: One of the most significant advantages is the cost savings. Hiring a professional to replace the fender can be expensive, especially when you factor in labor costs. By doing it yourself, you only need to pay for the cost of the replacement fender.
- Learning Experience: Replacing a trailer fender is a great learning experience. It allows you to gain a better understanding of your trailer's components and how they work together. This knowledge can be useful for future maintenance and repair tasks.
- Sense of Accomplishment: Completing a DIY project gives you a sense of accomplishment. Knowing that you were able to replace the fender on your own can be very rewarding.
When to Seek Professional Help
Despite the benefits of DIY fender replacement, there are situations where it's best to seek professional help.
- Complex Installations: If your trailer has a complex fender design or if the replacement involves intricate wiring and electrical systems, it's advisable to hire a professional. They have the expertise and experience to handle these complex installations without any issues.
- Lack of Skills or Tools: If you don't have the necessary skills or tools, attempting to replace the fender yourself can lead to more problems. You may end up damaging the trailer or the new fender, which can be more costly to fix in the long run.
- Safety Concerns: If you have any doubts about your ability to safely replace the fender, it's better to leave it to the professionals. Safety should always be your top priority when working on a trailer.
Conclusion
In conclusion, replacing a trailer fender yourself is possible if you have the right skills, tools, and knowledge. It can be a cost - effective and rewarding DIY project. However, it's important to assess your capabilities, follow the proper steps, and be aware of the potential challenges. As a trailer fender supplier, we are here to support you in selecting the right fender for your trailer and providing any guidance you may need.
If you're interested in purchasing a trailer fender or have any questions about the replacement process, please don't hesitate to reach out to us. We're always happy to assist you with your trailer fender needs and discuss potential procurement opportunities.
References
- Trailer Maintenance Manuals
- Automotive DIY Guides
- Industry Standards for Trailer Fender Installation